Wednesday, April 20, 2011

Saturday, April 9, 2011

Darth Vader Pancake

"Luke, I am a pancake."

I made this one by adding oreo crumbs to regular pancake batter, and then pouring that into the shape of Darth Vader's helmet. For the details I melted chocolate chips with the Oreo middles and used the edge of a spoon to put it on the pancake. :-)

Perfected the Palm Tree Pancake

Here is a picture of the process itself: I had to pour the batter onto the pan in the shape of a palm tree, then add chocolate chips for the coconuts on the tree, layer almonds going up the tree trunk as the bark, and then sprinkle coconut for the leaves.


Then I added an island to the palm tree scene by mixing cinnamon into the batter to look like sand and pouring it onto the pan to look like an island - more or less a disfigured circle.


The result was absolutely delicious! I was surprised at how well the coconut, almonds, and chocolates accented the taste of the pancakes.

Wednesday, March 30, 2011

Another twist on pancakes

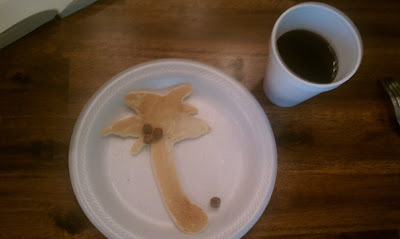
I decided to get creative again with my pancakes one morning while in Florida on spring break to have a more tropical theme. My sister, Hannah, requested the palm tree and added some Reese's Puffs to look like coconuts. Next time, I'll bake in some chocolate chips to that effect. ;-)


A tasty, tropical treat!

A little duct tape can go a long way

I saw some awesome zebra print duct tape at Target today and thought I'd make a craft out of it. I've made duct tape wallets and purses in the past, but never anything with such vibrant colors apart from the standard colors that duct tape comes in. Both of my cousins are really into zebra print (as am I), and I thought they might like some duct tape wallets to bring back an old fad - a fad that was popular when I was in high school, anyway.


Once you get the initial format of putting the duct tape together down, you can create virtually anything. If you want to see some really cool creations, I'm sure there are websites dedicated to the outfits people have made entirely out of duct tape. There are even contests centered on the most creative duct tape clothing. I can't imagine actually wearing duct tape though - it doesn't breathe.


In any case, making anything out of duct tape just involves matching the sticky side of two pieces of duct tape and then folding or cutting them into the shapes you want. With the wallets, I attached 8 long pieces of duct tape, meaning there were four long strips total. I lined up those four pieces and taped them together with more duct tape going across where the edges were. Once those are all connected, I added the lining around the outer edges so that they were smooth. Then I folded the entire rectangle horizontally and connected the sides together. After that you can get creative with how the outside looks. To get it to look like a wallet, I gave it a tri-fold and pressed it using a large book. Once you take it out, it assumes the shape you want it to. And there you have it. :-)

Wednesday, March 16, 2011

My latest art project

I've recently been inspired by the beauty of one of the most popular, and influential instruments of all time: the guitar. A friend of mine bought me three 16x20 canvases for Christmas in a secret Santa exchange. My immediate thought for their use would be to make a triptych. I went through a few other ideas before finally deciding to make them into part of the neck of an acoustic guitar. I'm attaching various sizes of wooden dowels to the canvases to look like strings. Here is the basic concept so far:


I haven't finished painting the canvases, and I haven't painted the dowels yet to look like guitar strings. But I'm already very excited about the final result. :-)

Wednesday, December 29, 2010

A fun gift idea

My cousin Meghan is really into Justin Bieber, like most other girls her age. For Christmas I decided to make her a hat box with cut out images of Justin Bieber from magazines. I was able to get ample material from only 3 magazines. Once I cut out the images, I used rubber cement to put them in place on the box. After the entire box was covered, I used Mod Podge to seal the images to the box and prevent them from getting messed up or ripped. When the Mod Podge was dry, I used an acrylic sealer to give the box a shine to it. That took 24 hours to dry. This is the result:


Meghan loved it. It's a simple gift idea that you could do virtually anything with. And all it takes is a plain hat box, a few magazines, and some glue. Happy gifting!